Upcycled Magazine Charm Bracelet Project

Charm bracelet made using old magazines, Elmer's glue, and embroidery floss
Kylyssa Shay
A little bit recycling, a little bit beading, and a little bit decoupage
This photo tutorial will take you step-by-step through the process of turning old magazines into an attractive charm bracelet. When you have completed this project you will have a one of a kind piece of jewelry to give as a gift or keep for yourself.

photo by Kylyssa Shay
Materials
- Assorted old magazines
- Scissors
- Elmer's Glue All
- Embroidery thread in your choice of color
- Spray varnish or spray lacquer
- A needle
- A ruler
- Some kind of work surface protection such as plastic, old newspapers, or even magazine pages
I suggest you choose old magazines on topics you or the recipient of your magazine charm bracelet enjoy. It will help you to find appropriate little images for the charms.
I've actually noticed that the best place for tiny images to use on the charms is usually the ad section found in the back of most magazines.
Search through your old magazines for tiny, charm-sized images you like. They must be no larger than three quarters of an inch by one half inch.
The images preferably should be wider rather than taller. Cut the photos out very carefully. You will need seven of the charm-sized images.
I recommend cutting out these tiny images first because it takes the most concentration while cutting.
I chose to use wee little fish from my old aquarium magazines because I love saltwater fish, as does the person I had in mind when I made it. I also had the magazines around.
Protect your work area by laying down some kind of barrier such as plastic, newspaper, or old magazine pages you don't mind destroying for both the gluing and the lacquering stages.
Making the Magazine Beads

photo by Kylyssa Shay
Make Bases for the Plain Beads
Cut seven strips .25 inches across also from the thickest, glossiest magazine pages, running the whole length of the magazine page. Don't worry about the color or printing. These will be used to form the bases of the beads and will later be covered with the paper of your choosing. They provide some size and bulk to the finished beads.
Apply glue lightly to one of the one quarter inch wide strips.

photo by Kylyssa Shay
Roll the paper up in a curl as shown, only tighter so the whole thing rolls up like a roll of toilet paper. Repeat this with the other six one eighth inch wide strips and set them aside.

photo by Kylyssa Shay


Cut wedges of paper from the old magazine with interesting patterns or colors one quarter inch wide and tapering to a point at about three inches. This will create interesting patterns and textures in the finished bead. This step determines the color of the finished beads. You will need seven of these wedges.
Apply a thin layer of glue to the back side of the wedges of attractive paper.
Wrap the paper wedge around the bead as shown.

photo by Kylyssa Shay
Your bead is completed; set it aside and make six more.
In a well-ventilated area, spray the beads with spray lacquer, applying several coats to make the beads water resistant. This step is necessary, otherwise the sweat or skin oils from the person who wears the finished bracelet will damage it, not to mention what will happen if that person washes his or her hands with the bracelet on. Allow the beads to dry completely between layers of lacquer and spray only one side at a time to avoid them sticking fast to your work surface protection.

photo by Kylyssa Shay
Making the Charms
Cut seven strips .75 inch across from the thickest, glossiest pages of your old magazine running the whole length of the page. Don't worry about what patterns, words, or colors are showing, this will not affect the appearance of your finished magazine charm bracelet. These strips will only form sturdy bases for the charms.
Fold the first three quarters inch strip about three eighths of an inch and apply a very thin layer of glue. Fold and glue the strip over and over until it is all folded and glued into a little packet like the one pictured below. Repeat with the remaining six strips.

photo by Kylyssa Shay

photo by Kylyssa Shay
Find interesting patterns, textures or text in your old magazine to serve as the background for whatever tiny images you have chosen for the charms. Cut the paper three quarters of an inch wide and at least one and a half inches long.

photo by Kylyssa Shay
Very lightly apply glue to the back side of the background paper and wrap it around the charm base, going in the same direction you folded the charm base. Carefully smooth the paper as you apply it to the charm base.

photo by Kylyssa Shay
Lightly apply glue to the back of the tiny image you have chosen to put on this particular charm and place it on the charm base where you want it to be on the finished charm. Set the charm aside and make six more.
In a well-ventilated area, spray the charms with several coats of spray lacquer or spray varnish on all sides to protect the charms from moisture. Be sure to allow each side of the charms to dry completely before flipping them over to lacquer their other sides. Otherwise you'll glue the beads to the work surface and rip all your careful work off the charms.

photo by Kylyssa Shay
Putting the Charm Bracelet Together
Thread a largish needle with twenty four inches of embroidery thread in your choice of color. Knot it two inches from the end with a tight triple knot.
Pull the needle through the bead anchoring the bead on the end of the thread, where the knot is.

photo by Kylyssa Shay
Push the needle through the top edge of the first charm. If you experience resistance, push it through slowly, twisting as you go.
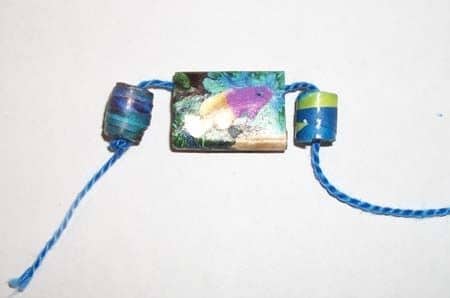
photo by Kylyssa Shay
Thread the next bead from the top as shown. Next, push the needle through the bottom edge of the next charm, twisting slowly if you experience resistance.

photo by Kylyssa Shay
Thread the next bead from the top as shown. Next, push the needle through the bottom edge of the next charm, twisting slowly if you experience resistance.

photo by Kylyssa Shay
Thread the next bead from the bottom as shown and push the needle through the top edge of the third charm. Continue on in this manner until you've threaded all of the beads and charms this way.
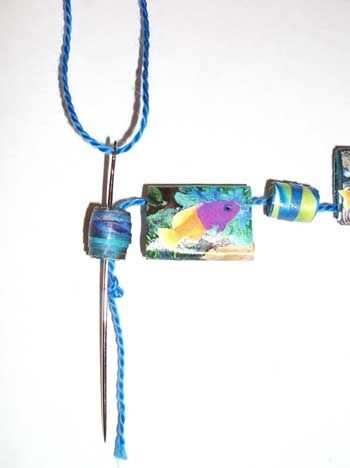
photo by Kylyssa Shay
Go back to the first bead, the bead that will be the latch bead. Thread another 24” length of embroidery thread on your needle and knot it tightly with a triple knot about two inches from the end. At the beginning of the bracelet, where you put the first bead, push your threaded needle through that first bead going in from the opposite direction you started on the first pass with thread and needle.

photo by Kylyssa Shay
Put your needle through the other unthreaded edge of your charm and repeat the same process you used to get from one end to the other of the bracelet except this time you are doing it in reverse, as shown.

photo by Kylyssa Shay

photo by Kylyssa Shay
Once you've strung all of the beads and charms together you'll need to finish the latch bead and the loop it will go into to fasten the charm bracelet.

photo by Kylyssa Shay
Tie the two ends of thread together right after the last charm and form a loop about three eighths of an inch long by tying the threads there in a double knot.

photo by Kylyssa Shay
Twist the ends of the thread around the thread of the loop as shown to make it thicker and stronger.

photo by Kylyssa Shay
Re-thread the needle with one of the remaining ends and apply a dab of glue to the thread, close to the charm. Use the needle to pull the thread back through the charm to anchor it. Cut off any excess thread that pokes through the other side. Repeat the process with the remaining thread end.

photo by Kylyssa Shay

photo by Kylyssa Shay
Return to the bead end and tie the thread ends off as shown, tying them around the threads between the first bead and the first charm. If any thread is still sticking out, apply a tiny dab of glue and use the needle to pull or to push the thread into the first charm to help secure the latch bead.

photo by Kylyssa Shay
Now your magazine charm bracelet is complete and ready to wear or give as a gift!

photo by Kylyssa Shay

photo by Kylyssa Shay
What Do You Think About Making Magazines Into Charm Bracelets?
Michelle A Carlson 1965 on May 09, 2019:
How cool the beads are! I am going to have to try this!
Anil on February 07, 2015:
I have to thank you for the efforts you have put in pennnig this site. I really hope to check out the same high-grade blog posts by you later on as well. In truth, your creative writing abilities has encouraged me to get my very own website now
Cynthia Sylvestermouse from United States on May 07, 2014:
Wow! What a really cool bracelet and craft idea!
anonymous on May 02, 2013:
Really cute.
Valerie Proctor Davis from Birmingham, Alabama on December 28, 2012:
Oh, how precious! I'm surprised at how nice the beads look.
anonymous on November 25, 2012:
I love this one. This is really creative. Great idea! I better try making this one too.
BluKatDesign on October 24, 2012:
What a fun project!
Dejha on October 16, 2012:
So cool! And excellent instructions. I'm going to make these as Christmas presents for my nieces.
Monica Lobenstein from Western Wisconsin on October 12, 2012:
Very cute! I like it! Upcycled magazines taken to a whole new level...
wrapitup4me on October 10, 2012:
I'm saving this one for future reference. Always wanted to know how to make those paper beads.
Ellen Gregory from Connecticut, USA on October 09, 2012:
This is a great craft. What fun and inexpensive.
kburns421 lm on October 09, 2012:
I also nominated this for a purple star :-)
kburns421 lm on October 09, 2012:
This is incredible! It's a little complicated, but I'm pretty sure I understood all the steps, especially with the pictures you included. I'm actually a big magazine pictures fan, and the only bracelets I'll ever wear are unique ones like that that I make, so this is kinda perfect for me.
AmandaTWaH on October 09, 2012:
The pictures make this so awesome and easy to understand!
Ardyn25 on October 09, 2012:
I think its an awesome idea and you've detailed making it very well...great photo directions. I may have to give this one a try.
Rosetta Slone from Under a coconut tree on October 09, 2012:
This is just too cool! I had no idea this was possible.
Jeanette from Australia on October 08, 2012:
This looks so effective. We've made the rolled up beads before but not the charms. I love the way you've strung them together.
anonymous on October 08, 2012:
What a cool idea! Great use for old magazines.
flycatcherrr on October 08, 2012:
I love this idea. Great instructions, too - I could tell just by reading and looking and the pictures that this is a craft I'd enjoy doing.
Mamabyrd from West Texas on October 08, 2012:
Oh wow these are really cool. I have a lot of magazines I may have to try this project.
Ahdilarum on October 08, 2012:
nice crafted one