How to Paint Your Old Fiberglass Boat ~ And Make it Look New Again!
Repairing the Hull
After thirty years, a boat needs a little attention.The hull may have noticeable hairline cracks, spider webs, blisters, dings, and tiny holes that have developed over the years. It is important to repairs these problems in order to prevent water from migrating into the fiberglass and causing damage that will grow over time. That is...the beginning of the end.
We sanded the bottom of our trawler, a 34 foot Marine Trader, down to the fiberglass and repaired blisters and pin holes to prep for an epoxy barrier coat.
We also made repairs to the hull (spiderwebs, pin holes, dings, hairline cracks, etc.) of the boat to prepare the surface for fresh paint.
Our Cost - Hull & Bottom Repairs: $449.83
- $49.99 - 1 gallon of Boater's Polyester Resin ($ 49.99 per gallon)
- $184.95 - 5 quarts of West Marine Surfacing Putty ($ 36.99 per quart)
- $184.95 - 5 quarts of West Marine Structural Filler ($ 36.99 per quart)
- $30 - sandpaper (60 grit, 80 grit, 120 grit, 220 grit
Note: A boatyard would also have charged us about the same as we paid for the products used for this job; however, they would probably have gotten the products at a much lower price, so they would probably make some money on the products.
Boatyard Estimates (what we potentially saved by doing it ourselves): $7000
- $3,400: Sandblasting the bottom would cost about $100 per foot. It took Luke about 80 hours to sand our 34 foot boat himself. A boatyard would sandblast the bottom because it is much quicker to do it that way.
- $3,600: Labor for repairing dings, blisters, etc. would be at an average of $90 per hour. It took Luke at least 40 hours to do these repairs.
Two Part Epoxy Barrier Coat
After sanding the hull down to the fiberglass, we made repairs to all the dings, spiderwebs, and tiny holes with a putty that hardens. When the putty dried, we sanded the repaired areas smooth.
When the repairs to the fiberglass were finished, we applied a two part epoxy that hardens to provide an effective barrier coat, a strong exterior surface over the fiberglass that will keep water from getting into the fiberglass.
We applied one coat of the two part epoxy above the waterline and four coats to the bottom using alternating colors (white, gray, white, gray), so that we would not miss any spots when painting each coat.
Note: The two part epoxy barrier coat has to be put on quickly because once the two parts are mixed together, the hardening begins. We mix one gallon at a time, and apply it within one hour.
Hint: By alternated colors (grey, white, grey, white), it is easy to avoid missing any areas.
Our Cost - Barrier Coat: $1,029.92
- $879.92 - 8 gallons ($109.99 each at West Marine) of Interlux Interprotect 2000E
- $150 - Miscellaneous items (drop cloth, two paint rollers, two paint trays, a package of rollers, rags, cheap paintbrushes - for painting areas on the bottom of the boat that the rollers cannot reach, sand paper (60 grit, 80 grit, 120 grit, 220 grit), four 5 gallon buckets, painting tape, and thin latex gloves.
Note: A boatyard would also have charged us about the same as we paid for the products used for this job; however, they would probably have gotten the products at a much lower price, so they would probably make some money on the products.
Boatyard Estimates (what we potentially saved by doing it ourselves):
- $1,530 (three coats of barrier coat) - $2,040 (four coats): Application of the barrier coat would cost about $15 per foot. It is recommended that at least three coats are applied in order to build up the thickness (for strength).
Do-it-yourself EPOXY: Mix the two parts in a 5 gallon bucket (make only gallon at a time) using a mixing tool attached to a drill (or mix/stir by hand). Apply with paint rollers quickly as the substance begins hardening once the two parts are mixed together. Finish the mixed batch within about one hour. Make the next batch in a new bucket and repeat. If the first bucket is completely dry when you are ready to mix up the third batch, you can use that bucket again.
Preparing the Hull for Paint
Although we applied four coats of the two part epoxy barrier coat to the bottom, we applied the first coat over the entire hull, including over the waterline. We used the grey color for the first coat so that we could fill in any tiny holes, nicks, or dings that we had missed repairing. Since the fiberglass is white, the tiny holes would show up white after we applied the grey epoxy. We were able to use putty on those tiny holes once they were more visible.
After the epoxy hardened above the waterline, we noticed that it dried as a rough surface, so we had to sand the entire hull above the waterline to prepare for the primer and paint. The more perfect the sanding job, the better the final surface of the painted hull will be.
Important: Never paint over the HIN (hull identification number) that is engraved into the transom of your boat!
Do not paint over the Hull Identification Number (HIN).
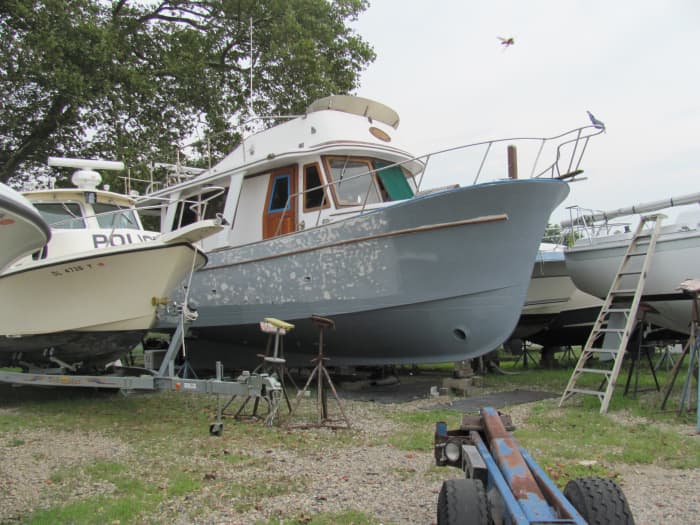
The first coat of epoxy (grey) has been applied to the entire hull (above and below the waterline). The spotty (white and grey areas) are where we have begun sanding the hull above the waterline smooth in preparation for painting.
Do-it-yourself SANDING:
Using an orbital sander, sand in a circular motion or up and down to avoid making indentations by keeping the sander in one place for too long. Sand up and down to create a smooth finish that will be unnoticeable on the hull after paint is applied. Feel hull to test for smoothness. Continue sanding until very smooth (like glass). As the hours pass by, and your arms ache, it helps to remind yourself that you are saving the cost of labor (about $90 per hour) by doing it yourself!

Another coat of barrier paint (white) has been applied to the bottom. Luke is still sanding the hull above the waterline smooth to prepare the surface for paint.
Surfacing Putty

After sanding the hull (above the waterline), we could see some tiny pinholes that we missed. We applied surfacing putty and allowed it to dry before sanding.
Sanding the Surfacing Putty
Smooth As Glass!
More Repairs...
More Repairs...
Taping the Teak
Covering theTeak Before Painting
First Coat of Primer
First Coat of Primer
Sanding the Primer
Applying the Bottom Coat (ablative anti-fouling paint)
After applying four coats of barrier coat to the bottom, we applied the bottom paint that will prevent barnacles from attaching when the boat is in the water. This is important because when the boat is pulled out of the water (dry docked or for repairs), if there is no buildup of barnacles, the surface is ready for another coat of bottom paint. If there are barnacles, it is very time consuming to scrape them off and sand the bottom before applying a new coat of bottom paint. It is also expensive to have a diver clean the bottom while the boat is in the water.
The ablative anti-fouling paint prevents barnacles from building up on the bottom of the boat while it is in the water. It is applied last, one coat at a time. You should apply at least two coats of bottom paint. Each coat lasts about a year in the water. With two coats, one coat will remain after a year, and with no barnacle buildup, your boat will be ready for another coat. We applied four coats of bottom paint so that we do not have to pull the boat out of the water for awhile once we drop it back in. If you pull your boat out each year for the winter, you may need two or three gallons.
Our Cost - Bottom Paint: $1000
- $899.99 - 5 gallons ($179.99 per gallon at West Marine) of PCA Gold Ablative Anti-fouling Paint
- $100 - Miscellaneous items (a package of rollers, rags, cheap paintbrushes - for painting areas on the bottom of the boat that the rollers cannot reach, one 5 gallon bucket, and thin latex gloves.
- $ 0 - Reused items (drop cloth, two paint rollers, two paint trays)
Note: A boatyard would also have charged us about the same as we paid for the products used for this job; however, they would probably have gotten the products at a much lower price, so they would probably make some money on the products.
Boatyard Estimates (what we potentially saved by doing it ourselves):
- $510 (one coat of bottom paint) - $2,040 (four coats of bottom paint): Application of bottom paint costs about $15 per foot. A boatyard may apply only one coat which would mean that you would have to pull the boat out of the water sooner. Each year a layer of the paint wears away, and it is recommended to put another layer on each year. Many people dry-dock their boats for the winter, so one coat is usually all they would need. We wanted to apply at least three coats because we were starting out with no bottom paint at all and we want to avoid dry-docking the boat for as long as possible as we plan to live aboard the boat.
Ablative Anti-fouling Bottom Paint

Ablative anti-fouling paint prevents barnacles from attaching to the bottom. Each coat dries quickly, so several coats can be done in a single day.
Do-It-Yourself: BOTTOM PAINT
Pour into a 5 gallon bucket and mix well by hand or with a drill mixing attachment. Apply with paint rollers. Wear protective suit (you can buy a breathable white suit for this purpose) when painting toxic substances. You should also protect your eyes with protective eye wear.
Do it yourself, or pay to have it done?
Comments
I have just paid to have mine done, but will do it myself in future. I also had the bottom blasted as ther were too many coats of anti-foul on and could not get a smooth surface due to the build up of on June 03, 2017:
I had the hull above the water line painted and the deck as well. Included in this was all the repairs to the fiberglass, dinks and small holes scraped and filled with epoxy resin and sanded down. I have done all the woodwork myself. The cabin door,hand rails and rudder, 16 coats of varnish. One weeks work on the wood alone. Now she looks like a new boat, being built in 1980. Jaguar 25. Next year is just cosmetic work on what has been completed this year. Looking forward to it, especially varnishing.
dddienst on August 09, 2014:
Down to the fiberglass or down to the gel-coat? It says the fiberglass is white which sounds like the gel-coat It think the fiberglass is a translucent tan or greenish color so I am confused.
Kingfish56 on June 07, 2014:
I just purchased my first boat! 16' Aquasport Playmate 1978. I really appreciate your experience and the way you explained everything. ..
16' isn't as large but it's a daunting task when you have know idea where or how to start! Thanks again!
ocean48 on March 19, 2014:
I missed the part about painting the hull above the water line.
what was the cost to paint hull above the water line?
what I have read, was cost in feet. exactly how do you measure footage?
Thanks
Tom Schumacher from Huntington Beach, CA on February 08, 2013:
That was an enjoyable read. Energy invested to maintain your vessel can be relatively inexpensive and fun at the same time. - Thanks.

