How to Make a Stress Ball From a Plushie

Make your own stress ball with this easy tutorial!
How to Make a Stress Ball
Make your own stress ball from a plushie!
This is a great summer craft to create with your kids. You can use whatever items you have on hand at your house to customize your plushie. It's pretty simple and a lot of fun to make!
Some of the best crafts come from experimentation. Such is the case for this adorable plushie. My son and I spent two weeks creating fun crafts out of household items. We were playing around with the idea of making our own stress ball. We initially tried using poly foam pellets from an old bean bag chair, but it didn't turn out quite like we were expecting.
However, we tried using BBs to fill up the remaining balloon and decided to wrap it in a scrap of fabric from an old sweater. What started out as a stress ball turned into an adorable stress plushie. My son and I were both delighted at the final result!

Put metal BBs in your balloon to create a wonderful anti-stress ball.
DIY Stress Ball Materials
- A balloon
- Metal BBs (or whatever filling you'd like to use)
- Empty plastic water or soda bottle
- An old sweater or T-shirt
- Two buttons
- Black and pink Sharpie markers
- Scissors
- Hot glue gun

Knot the balloon closed.
Step 1: Fill the Balloon With BBs
- To start, cut the top of your water or soda bottle to make a funnel. This will make it easier to fill your balloon.
- Wrap your balloon around the opening of the bottle.
- Slowly pour BBs into the balloon, filling it up. We used half of our container of BBs.
- Carefully remove the balloon from your bottle and tie it closed.
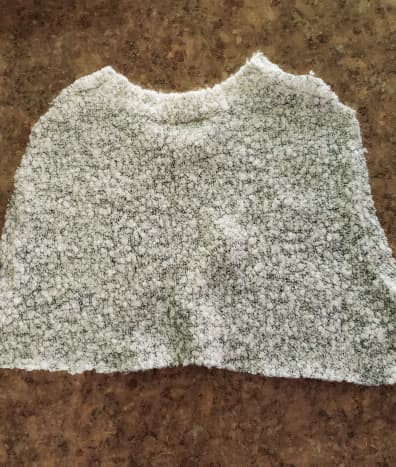


Step 2: Cover With Sweater Fabric
- Cut off the arms of your sweater. Then cut along the side seams and along the neck to create two rectangular pieces of fabric.
- Place your balloon on the fabric and roll it so that it is covered. Hot glue the seam.
- Cut off the excess fabric on both sides, leaving a little extra to fold in.
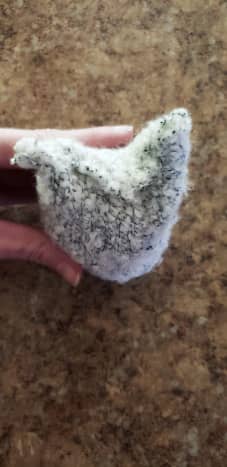


Step 3: Create the Ears and Then Glue
- Position the fabric so that the seam is facing you. This will be the back of your plushie.
- Fold the excess fabric on the seamed side down over the top of your balloon.
- Fold the front flap down over top to create two ears and secure with hot glue.
- Continue gluing up each triangle shape, folding the fabric on top of itself to secure it closed and seal up any holes.
- Once the glue is cured, fold the bottom side down and hot glue the excess fabric to create a flattened bottom.


All done!
Step 4: Add the Face
- Flip your plushie around. Hot glue your buttons on to create two eyes.
- Using your black Sharpie, make a small mouth between the eyes. Make two pink cheeks on either side using your pink Sharpie.
- Once the glue has completely cured, enjoy your new plushie!
Comments
Alyssa (author) from Ohio on June 30, 2020:
Thanks Jason! I appreciate your kind words and I hope you enjoy making this. Let me know how it goes!
Alyssa (author) from Ohio on June 30, 2020:
Thank you, Pamela! It was a lot of fun to create :)
Alyssa (author) from Ohio on June 30, 2020:
hahahaha! Thank you, Bill!
Jason Nicolosi from AZ on June 29, 2020:
Very cute. Looks like it would be a lot of fun to put together. The article was well written and easy to follow. I'm looking forward to giving this craft a try. Nice job Alyssa.
Pamela Oglesby from Sunny Florida on June 29, 2020:
It sounds like you had such a good time making this with you son. It is so cute. You are very good at coming up with good DIY crafts.
Bill Holland from Olympia, WA on June 29, 2020:
I can absolutely guarantee I would have done the same thing and had bb's all over the house. Anyone who tries this owes you a debt of gratitude. :) Cute craft idea!