DIY Jewelry Tutorial: How to Make a New Necklace out of an Old Bracelet
Make a Beautiful New Necklace Out of an Old Bracelet
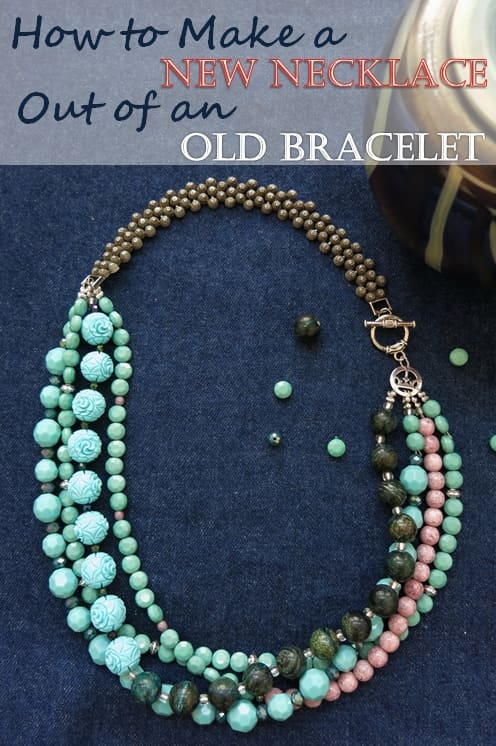
I love finding ways to reuse and reimagine my old jewelry pieces into new items that I will enjoy wearing again. This creative design uses a link bracelet as the neckband for a beaded necklace. For this necklace, I used an old bracelet that I no longer wore. But you could also make this beaded necklace using a shorter necklace (14 inches to 18 inches long) as your neckband for your new necklace.
This tutorial assumes the reader has some familiarity with jewelry tools and basic beaded techniques. For step-by-step directions on making beaded necklaces, please visit my tutorial on making multi-strand beaded necklaces.
Things to Look for When Choosing Your Bracelet or Starter Necklace
There are a few things to look for when choosing a bracelet or necklace to make into a new necklace:
- Movable Links: You want to choose a bracelet or necklace with movable links that bends around your wrist like a watch band (see photo above for example). Do not choose a cuff or solid one-piece bracelet. Your moving bracelet or necklace will have to sit around the back of your neck and serve as a hanging band for your new necklace.
- End Loops or Rings: Choose a bracelet or necklace that has a loop or ring at each end to which you can attach beads.
- No Sharp Edges: Be careful not to choose a bracelet or necklace with any sharp edges or points. Again, this piece will be hanging around your neck, and you will want it to be comfortable.
- Sturdiness: Make sure your bracelet or necklace is solid and sturdy enough to hold the weight of your beads. You probably want a bracelet or necklace that is about 1/2 an inch wide, but not wider than 3/4 of an inch.
Materials for Making Your New Necklace
- A link bracelet or necklace (see description above)
- A lot of beads: I used 6 strands of beads, mixing different colors and sizes for my necklace, but you could also create your necklace using all the same beads.
- Beading wire: This is available at most craft and bead stores. I use this .024-inch wire because it's what I have on hand. Just make sure your beading wire will fit through the holes in your beads.
- A clasp to close your necklace (optional): If you make your necklace long enough to fit over your head or if you start with a long necklace as your band, you may not need a clasp. However, if you need a clasp, choose a pretty one as it will show in the front of this necklace design. You might also want to choose a clasp that has the same finish (gold or silver) as your starter bracelet or necklace.
- Three jump rings: These are not shown in the photo above, but one should be larger than the other two. (For more information about jump rings, visit my beading tutorial link above.)
- A bunch of crimp beads: These are also not shown in the photo. (Again, see my beading tutorial for more information.)
- A pair of needle-nose pliers
- Wire cutters
How to Make a New Necklace From an Old Bracelet or Link Necklace
1. The first step in making your new necklace is to remove the old clasp from your bracelet or starter necklace. Be sure to keep the attached link or ring intact as you will be connecting your beads to these rings. I was able to remove my clasp by carefully cutting it off with some wire cutters. You could also use a Dremel tool to cut off your old clasp.
2. Depending on the design of your bracelet or starter necklace, you may want to decide which direction you want it to sit on your neck, and which end you want the clasp for your new necklace to be on. I'm left-handed, so I wanted my clasp to be on the left side, but it may not matter to you.
3. Next, decide how many strands of beads you want your necklace to have and the length you want your new necklace to be, including the length of your starter bracelet or necklace. I knew I wanted my necklace to have four strands of beads and be about 23 inches long when complete.
- Once you've decided on the length of your finished necklace, subtract the length of your starter bracelet or necklace (my bracelet was 7 inches long, so I subtracted that from 23 inches leaving me with 16 inches). Then, using your wire cutters, cut a piece of beading wire for each strand of your necklace that is at least 6 inches longer than what you need. For my necklace, I cut four strands of wire that were each 22 inches long.
How to Attach Your Beads to Make Your New Necklace
4. Take one strand of your cut beading wire and slip two crimp beads on the end (if the beads you are using are particularly heavy, you may want to add a couple more crimp beads on each strand of wire). Then beginning at the end of your bracelet or starter necklace that is opposite where your clasp will be, feed your beading wire through the ring or loop on your starter bracelet.
5. After feeding your beading wire through your bracelet ring, slide your wire back through your two (or more) crimp beads and pull them as close to your bracelet ring as possible. In doing this, try to only use a couple of inches of your beading wire (see photo above).
6. Now take your needle nose pliers and gently squeeze your crimp beads so that they tighten and hold in place. Squeeze each crimp bead separately, not all together at once. Squeeze them, so they are tight and don't move, but not so tight that they crack. Check that each crimp bead stays in place after you squeeze it.
7. Repeat steps 5 and 6 until all your strands of beading wire are attached to the ring on your bracelet or starter necklace. Do not cut the shorter end of your beading wire yet.
8. Now you can start sliding your beads onto your wires. If possible, as you add your first couple of beads to each strand, slip both ends of your beading wire through these beads to hide the shorter end (see photo above).
9. I like to add beads to all my strands at the same time, so I can see how they look together, but you can also just focus on one strand at a time.
10. Continue to add beads to your strands of wire until your necklace is the desired length (including the length of your starter bracelet or necklace). I chose to mix different colors and shapes of beads on each of my strands, but you can arrange your beads as you wish.
- I also decided to make my strands of beads all the same length, but you could create your new necklace with graduated strands of beads. A graduated necklace would have a shorter strand of beads closest to your neck, then each proceeding strand would be a bit longer. To learn more about making a graduated beaded necklace, visit my beading tutorial linked above.
Add a Clasp to Finish Your Necklace
Once your necklace is the desired length, it is time to add your clasp. As stated above, if your necklace is long enough to fit over your head, you don't need to add a clasp. However, if your necklace is shorter, you will need a clasp.
11. Using your needle nose pliers, take your large jump ring and attach it to one piece of your clasp using a smaller jump ring. I didn't have a large jump ring, so I used this charm that had openings where I could attach my bead strands. I used a smaller jump ring to connect my larger jump ring (my charm) to my clasp so they would both face in the same direction when lying flat.
- See my beading tutorial for directions on how to open and close jump rings.
12. Now, working with one bead strand at a time, add the same number of crimp beads to the beading wire that you used at the beginning. Then slide your wire through your large jump ring. Next, feed your beading wire back through your crimp beads and through the next couple of beads on your necklace (if possible). Pull the end of your beading wire tight so there are no gaps between the beads or between your beads and the large jump ring. You can use your pliers to pull your wire tight while working.
13. Once all your beads are pulled close together, use your needle nose pliers to squeeze your crimp beads so they hold your beading wire in place.
14. Continue to connect all your bead strands to your large jump ring in this manner. Once all your bead strands are attached, trim the ends of your beading wire using your wire cutters. Try to trim your wire as close to your beads as possible, but be careful not to cut through your finished necklace.
15. Lastly, use your remaining jump ring to attach the other end of your clasp to the ring or loop on the other end of your bracelet or starter necklace.

You can get a different look by connecting your bead chains to the clasp in a different order.
(c) purl3agony 2017
16. I chose to connect my strands of beads to my clasp in a different order than they were laid out at the starting end. This is a design choice I made, and there are directions on how to do this in my beading tutorial linked above. This creates a twist in the beads and allows the different colors to show.
Show Off Your New Piece!
However you decide to lay out your beads, I hope you make a new necklace that you love and enjoy wearing!
© 2017 Donna Herron
Comments
Donna Herron (author) from USA on August 29, 2019:
Thanks, Hollie! This is a great selection of repurposed jewelry projects.
Donna Herron (author) from USA on April 03, 2017:
Thanks, Rachel. Sounds like you came up with a great solution to your necklace issue. I'm just happy to be able to wear this bracelet again (and it was a good excuse to make a new necklace!). Thanks for your comments! Hope things are humming along in your kitchen!
Rachel Alba on April 02, 2017:
Hi Donna, You are very clever. I love the look of the necklace and bracelet you made. I did that only once when I ordered a necklace and bracelet on line and the necklace was too small for me so I added the bracelet to it. Thanks for the instructions you shared for this project.
Blessings to you.
Donna Herron (author) from USA on March 29, 2017:
Thanks, June! This necklace might be my new favorite, and I'm glad you like it too. Thanks so much for stopping by and commenting. I appreciate it!
KonaGirl from New York on March 27, 2017:
You always come up with the coolest ideas! I liked the funkiness of the bracelet, to begin with, but how cool to turn it into a muli-strand bead necklace! Pinned to my DIY Jewelry board.
https://www.pinterest.com/konagirl/diy-jewelry/
Donna Herron (author) from USA on March 27, 2017:
Thanks, Heidi! I've always loved this bracelet, but rarely wore it. I'm glad I found a way to make use of it again in a new necklace. Thanks, as always, for your comments and support!
Heidi Thorne from Chicago Area on March 27, 2017:
Definitely a great way to "recycle" jewelry. Makes a nice statement piece. Thanks for always sharing your amazing creativity with us!

