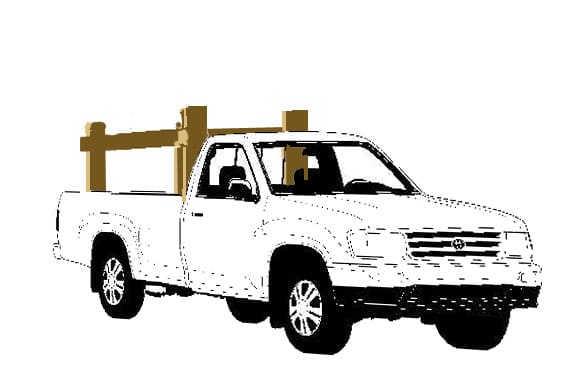
Easy Canoe and Kayak Rack for Your Pickup
This handy wooden rack lets you haul your canoe, kayak, or anything else that's too long for the bed by strapping it to the top of the frame. The rack lifts in and out over the tailgate and uses bungee cords or ratchet tie-downs to hold it in place when in use.
This thing is easy to build and loadable by two average people or by one superman who understands Archimedes' principles of leverage. If the rack is too heavy for you to build with 2x6s (or if you're cheap), you can build it with 2x4s. With only a single boat up top, the 2x4 frame works fine.
Materials and Tools
To build the rack, you'll need the following supplies.
Materials
- 4 pressure-treated 12-foot 2x6 boards (use 2x4s for lighter framework)
- 4 pressure-treated 8-foot 2x6 boards (or 2x4s)
- Box of 3 1/2-inch long galvanized screws
- Eight 1/2-inch carriage bolts, 4 inches long with nuts and lock washers
- Carpet strips, 6 inches wide the width of the pickup bed
- Eight half-inch lag bolts, 4 inches long
- 3/8-inch eye screws
Tools
- Sawhorses
- 2 spring clamps
- Staple gun and 1-1/2 inch staples
- Tape measure
- Carpenter speed square
- Pencil
- Bungee cords
- Drill and drill bits
- Circular saw
- Ratcheting tie-down straps, 12+ feet long
Illustrated Steps to Build the Rack

This wooden rack lifts in and out of the bed when you want to use it. Ratcheting tie-downs will secure the framework to the bed of the truck.
Step 1: Cut the Rack Legs
Cut 4 2x4s or 2x6s six inches taller than the cab roof from the floor of the pickup bed. These will be the legs of the frame. You can use 2x6s instead if you want a heavier frame. (See images for all steps above.)
Step 2: Cut the Cross Beams
Cut 4 2x4s or 2x6s four inches narrower than the inside of the pickup bed to allow for the sideboards you'll add later.
Step 3: Bolt the Cross Members to the Legs
Drill holes at the center of each joint where the cross members intersect the legs. Bolt the cross members to the legs with carriage bolts. Make sure the cross members are on the inside of the frame. Repeat with the other pair of legs.
Step 4: Attach the Side Boards
Lag screw 2x4 or 2x6 side boards to the frame. Predrill holes for the half-inch lag screws and tighten the lag screws. Use a washer between the head of the lag screw and the wood. Repeat on the other side.
Step 5: Add Stabilizing Screws
Add a couple of galvanized screws beside the bolts to stiffen the framework.
Step 6: Add Eye Screws for Tie-Downs
Predrill and attach half-inch eye screws to the outside of the legs at the top facing front and back. These will be used to tie down the rack and whatever load you carry on the rack.
Loading the Rack
I custom fit this rack to my truck by screwing big 1-1/2 inch eye screws in convenient places on the wooden rack so that I can stretch bungee cords between them and anchor points in the truck bed. You can use rope and some fancy knots too if you'd rather. Doesn't matter which, but if the rack isn't tied down, you'll regret it. A canoe can go airborne on you and take the rack with it and that my friend would be a big old mess and dangerous to anyone driving behind you.
Use Leverage
When you're loading a canoe or any long load, the easiest way, especially if you're loading by yourself (or if your helpers are a 12-year-old and a 10-year-old), you can just lay the boat behind the truck, lift the end closest to the vehicle, and leave the other end safely on the ground.
Note: I put an old quilt under the stern of my canoe so it doesn't get scratched when I slide it forward.
Slide the end of the canoe or long load onto the back end of the rack, then move to the low end, lift it up, and slide it onto the rack.
Tie the Boat Down
Then, tie it down immediately. Make it a habit to tie the boat down right then, lest you get distracted and forget. It's easy to do. You wouldn't be the first person to take off with an untied boat on top. At about 30 or 40 mph, they tend to become airborne if not secured properly.
With the rack tie-downs in place, you shouldn't need to tie the front or back ends down, but I do it anyway because I prefer to be overly safe than massively sorry. It's pretty easy to run a line through the painter's eyes on the bow and stern of the boat and tie the ends to the steel eyes under the bumpers of your truck or car. (These are left from the manufacturing process and are used by car makers to attach the vehicle frame to the assembly line. They make handy tie-down points for car-topping a canoe.)
Illustrated Steps to Pad with Swim Noodles

You can also use the noodle to wrap over the top of the wooden rack to protect the canoe's gunwhales from rubbing against the rack.

If you wrap zip ties around the noodles they will stay in place on top of your canoe rack and protect your boats quite nicely.
DIY Padding to Prevent Rubbing
If the bow or stern tie-down ropes rub against the paint on your hood or tailgate, get yourself some of those foam swim noodles they sell for kids to play with in the pool. Get the ones with hollow centers.
Cut the noodles long enough to protect your truck's paint where the tie-downs touch the truck. Feed the ropes lengthwise through the holes in the noodles and then when you tie them down, just slide the noodles over the rope where it rubs against the hood. The noodles will prevent chafing.
If your rope won't easily go through the noodles, you can cut the noodle lengthwise, push the ropes into the cut, and then duct tape the noodle back together as shown in the illustrations above.
This rig not only secures your canoe, it protects your truck as well. And the more bungees involved the better I always think.
Photos of a Completed Canoe Rack
This content is accurate and true to the best of the author’s knowledge and is not meant to substitute for formal and individualized advice from a qualified professional.
© 2011 twayneking
Comments
twayneking (author) from Puyallup, WA on February 22, 2012:
Thanks for your concern, Floyd, but I wrote the "original" website. The 2-by-6 frame was overkill and too heavy to make lifting it in and out of the truck bed practical. Bolts tight and tied down to the bed, the 2-by-4 frame is plenty strong. I use the lighter frame to carry a couple of normal sized canoes. If I were hauling a pair of 20 foot war canoes, I might prefer the 2-by-6's but that's mostly cause I like things over-engineered. Not to fear, Floyd. the engineering is sound and the 2-by-4 framework does fine. I did add a couple of metal angle braces to stiffen the structure a bit. I used nails on the 2-by-6 frame for the same purpose. Either way you want to do it, the construction is the same. - Tom
Floyd Young on February 22, 2012:
The original website states to use 2x6s NOT 2x4s, this is bad information that could cause someone to get hurt or damage property.


