Recycling a Shirt into a Shabby-Chic Waistcoat
Including the Mistakes I Made Along the Way!
This is a pretty easy project - especially if you're someone who loves fabric decoration, rather than cutting patterns.
I'm not very good at garment construction so I've been looking for simple ideas to make customised clothing without having to get my tape measure out too much!
All you need is an old shirt - preferably one that's still in an OK state (holes under the arms are fine because you're going to cut a deeper arm hole anyway), a little imagination and a lot of decorative bits and pieces.
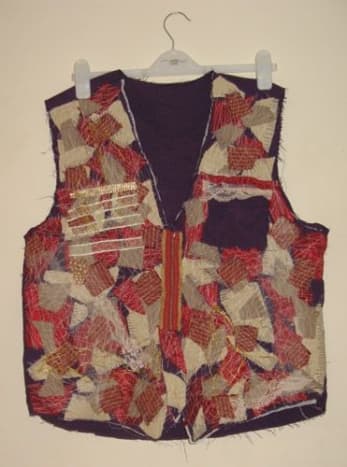
Above: My finished shabby-chic waistcoat.
As I said in the intro, you need a shirt that's still in a reasonable state.
If it has holes of stains down the front don't despair - those will be covered up when we get to the decorating stage.
Likewise, if the sleeves are ruined - perfect! The sleeves will be cut off.
Ratty collars will be cut away too - great if your guy has designer stubble that shreds through his shirt collars or your washing machine won't shift those tide marks!
Holes under the arms also don't matter as we'll be cutting deeper arm holes.
The only place that needs to be relatively perfect is the back of your shirt as we won't be touching that.
If you already have a waistcoat then use that as your guide to cut the sleeves and collar away from your shirt.
Bear in mind that your ready-made waistcoat will probably be a tighter fit than the shirt you want to use for your new waistcoat. Don't be tempted to cut away the side seams. When you begin to sew the decoration on the front of your waistcoat it will pucker and pull in a little.
If your recycled shirt still ends up being too big then shape it on the body to work out what its actual size should be.
Above: A quick doodle to give you some idea of how to cut your shirt into a waistcoat shape.
Above: The basic waistcoat shape.
I first started this project about a year and a half before I wrote this lens and this is what I originally came up with (see image below).
I backed the front of the shirt with a piece of wadding, layered up lots of bits of fabric and thread, covered the whole piece with ivory organza and then sewed it down into place.
At the time I was really into making layered textiles this way.
Anyway, I gave up after just sewing one side of this waistcoat and can you blame me?
I can't bear the colours I used and the fact that the gorgeous purple colour was completely hidden under a layer of organza which muted it and made it all look a bit ugly.
Plus the wadding was adding too much extra padding and wouldn't have looked very flattering on the figure and probably would have shrunk the fabric quite a lot more than I wanted.
Above: My first attempt at decorating the waistcoat.
I decided I wanted to use red and white fabrics on this waistcoat instead of the horrid blue and green and a little bit of everything colour scheme I started with.
Actually I wanted to use creams and faded reds but I decided to work with what I already had in my stash.
Above: My stash of fabrics for starting this project.
The best thing to do for choosing your colour scheme is to take your shirt and have a scrabble around in your fabric stash and see which fabrics look great against it.
I'd got the colour scheme badly wrong the first time I decided to make my waistcoat - mainly because of the hideous way the organza muted everything!
If you're having trouble deciding what looks best then have a look around at what other people have made when using the same colour as you.
You could even experiment by making samples from the pieces of fabric that you've cut from your shirt.
1. Patch Work.
I'm mainly stitching patches to my waistcoat fronts.
You can find more ideas for patches in my lens featured lower down this page.
2. Yoyos.
Yoyos are ruffly circular pieces of fabric than can be sewn onto your waistcoat fronts to decorate them.
3. Dye.
Dyeing and painting are ways you can change the front of your waistcoat - also think about bleaching too. You could even patch your waistcoat and then dye it to make the patches fit in better with the original shirt - tie dyeing over patches of different colours could also be interesting.
4. Embroidery.
You could stitch with your sewing machine - perhaps using free motion embroidery to create some imagery or interesting patterns or you could hand embroider the waistcoat fronts. Hand embroidery gives you more control.
5. Ruffly Bits.
Ruffles can be made and attached to the waistcoat. You could completely cover a piece with lace and pieces of fancy fabric.
Above: A few ideas for decorating a waistcoat.
When I first started working on this waistcoat again I just starting stitching fabric to fabric without a care in the world until I saw how much my waistcoat front was buckling (see below).
I'd already sewn quite a bit when I realised that what I needed was some interfacing.
It took me quite a while to unpick all that stitching!
Once I had my interfacing I cut it to the right size and ironed it in place on the back of my waistcoat fronts. The interfacing didn't leave my fabric perfect but it did reduce a lot of the distortion.
I used heavyweight interfacing to line my waistcoat fronts - experiment with a sample to see what you need. I was using an old Husqvarna sewing machine that likes to chew up thin fabrics so it was better for me to have something thicker to work with.
You may wish to line your patches with interfacing too.
Above: Starting to add texture to the waistcoat.
I decided that I would just jump right in with decorating my waistcoat and sew medium-sized patches down onto the waistcoat fronts.
I decided to keep it all fairly random and not worry about what was going where.
I took care not to have too much of one colour in one spot.
To start with I used just two different fabrics.
I used a strong white thread - seeing as one of my fabric choices was a pale cream colour - and just stitched backwards and forwards over the fabric until they were sewed down to my satisfaction.
Consider how much your fabrics are going to fray. I decided that I loved that shabby look and didn't mind fraying although I stitched thoroughly over my fabric patches to keep fraying minimal.
In the image below you can see that I decided to keep the pocket free of detail. I wanted the pocket to still usuable and I thought it would be difficult - or at least time-consuming - to decorate the pocket so I just left it.
Above: One side done.
I started playing around with adding purple stitching on top of the fabrics once they were all sewn in place.
I decided, after sewing this patch, that I would leave the rest of the purple detail until later so that it wouldn't get covered over when I added more fabric on top.
I wanted to use the purple stitching to tie in the appliqued fabrics with the colour of the shirt behind.
Above: Detail of the decoration as I sew into the patches with purple thread.
Above: The basic decoration is all in place. Now to work into it!
I decided to go back into my waistcoat fronts and add a few more little patches of fabric to break up the larger patches of colour.
In the image below you can see how I've added an interesting piece of seam allowance down the front to add a bit of interest.
Already I was starting to think about adding areas of interest.
I'd also sewn pieces of fabric down the shirt front - this was awkward because that centre front flap goes over the top of the buttonholes. I had to sew it separately to the rest of the piece so that I didn't end up stitching the buttonholes up.
Above: It's starting to get interesting!
Once I had all the basic "background" elements of my waistcoat decoration sewn into place, I started adding some little random interesting bits.
I mirrored the left breast pocket with lines of stitched-on ribbon.
I added gold net to a few different places and covered white net over others.
Place little bits and pieces on top of your waistcoat fronts and play around with their positioning.


The inside of your waistcoat may look like mine does, opposite, and like me you probably want to hide it.
The first thing to do is give your waistcoat a good iron and make sure it's completely flat.
Take your lining fabric and place it on top of the inside of your waistcoat front. Make sure the lining fabric is face up.
Smooth the fabric down so that there are no creases.
Pin the lining to the waistcoat fronts. Place pins all around the edges and along the middle so that it stays in place.
Next cut the lining fabric to the right size - you may find it easier to cut with the waistcoat the right way round.
Leave enough fabric for seam allowance at the shoulder and the side seam.
Fold the seam allowance at the shoulder and side seams underneath and sew into place.
Leave the lining pinned at all the other edges - this will be sewn into place when the bas binding is sewn on.
Alternatively you can tack your lining in place to make sure it won't shift or bag.
Above: The inside of the waistcoat with the lining stitched into place.
I finished my waistcoat edges by covering them with bias binding.
I love bias biding because it gives you a really clean, crisp edge and hides all those raggedy edges in a quick and simple way.
You can either buy bias biding in the colour you need or you can make your own (see details below).
Things can get a bit fiddly when sewing bias binding to your waistcoat. I had some trouble with my waistcoat because of the button front which is double layered. If your shirt front is the same then you may need to be a bit clever!
Above: All the bias binding is sewn into place on the front of the waistcaot and just needs folding over and sewing into place on the inside of the waistcoat.
To use bias binding place it wrong side up on the right side of your waistcoat edge.
Flatten the fold of the binding down.
Line the edge of the flattened binding up with the edge of your waistcoat piece.
Pin along the folded line.
Sew along the fold. This will give you a strip of binding down the edge of your waistcoat. I'm using 2" bias binding so I will be left with a red edging that's approximately 1/4 of an inch.
When you've sewn the binding to the front of your waistcoat edge then fold the binding over so that both the binding and the waistcoat are top sides up.
Fold the binding to the inside of your waistcoat and hand stitch the binding in place.
Bias Binder Maker
It's so easy to make your own bias biding if you have one of these bias binder makers.
My bias binder maker makes binding from 2" strips of fabric.
When I need bias binding for my projects I take a piece of fabric and cut 2" strips diagonally across the fabric. Cutting the strips diagonally means that they will stretch and you can use them to neatly finish curves without any weird tucks.
Once your strips are cut you then feed them through the device shown below. When the strip comes out the other end iron it flat. You're then left with a strip of fabric with 2 little folds.
To find out where to place your buttons line up the fronts of your waistcoat.
Slip a pin through the button hole into the fabric beneath.
You now know where to place your buttons.
Above: Sewing the buttons in place.
The waistcoat hasn't ended up perfectly tailored and symmetrical but that's part of it's charm (well that's my story and I'm sticking to it).
I had a bit of trouble with the bias binding at the bottom front so I decided to just finish the front of with that ruffled bit of ribbon to hide the messy edge. I also used a bit of the ribbon at the edge of the pocket.
Above: My finished waistcoat.
Share Your Thoughts - Reader Feedback.
Rachel Field (author) on July 31, 2010:
@WildFacesGallery: Thanks so much :) Glad you enjoyed it!
Mona from Iowa on July 31, 2010:
Great fun watching it all come together. You do make it look easy though. Nicely done. :)


